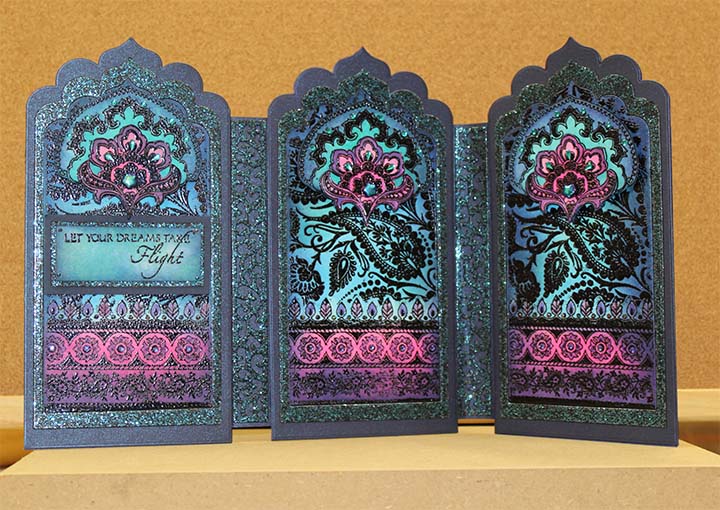
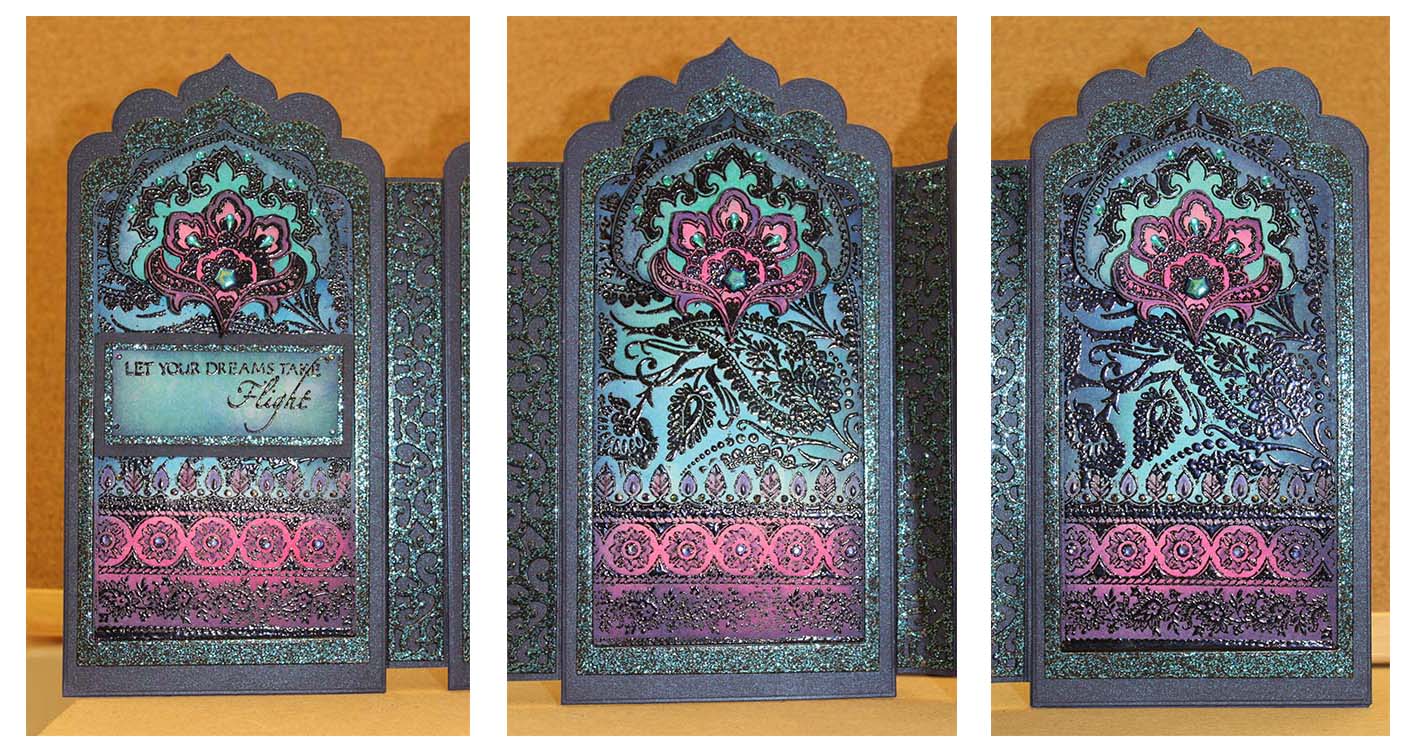
Indian Screen Card by Elaine
2 Comments6 August 2015 | Lesley Wharton
When I first took over Chocolate Barqoue in June I was lucky enough to receive this beautiful card from Elaine Garrett. Elaine used to be part of our Design Team and I thought this was such a special card it needed to be showcased on our Shop Blog. And in her true generous spirit Elaine has kindly written a full step by step for you if you wish to try this one for yourself.
Indian Screen Card
 Materials:
- Indian Textile, Paisley Elephant and Butterfly Dreams stamp sets
- Crea-Nest-Lies Extreme Labels and Tags die No 3
- Decorative edge die or punch (optional)
- Faber Castell Art Grip Aquarelle pencils
- Distress inks: Peacock Feathers, Chipped Sapphire, Salty Ocean and Picked Raspberry
- Ink blending tool and sponges
- Violet embossing powder
- Anti static bag
- Heat gun
- Score board
- Cardstock: white, dark blue pearlescent and dark blue glitter
- Versamark embossing ink
- Selection of toning self adhesive gems
- PVA glue with a fine nozzle and small black foam pads
- Post it note or masking tissue
- Using the largest three dies in the tag die set cut out 3 dark blue (largest), 3 dark blue glitter (medium) and 3 white (smallest) die cuts. To save the glitter card I positioned the smallest die inside the larger die to give a frame die cut each time. You can use a magnetic sheet or platform to help you position your dies accurately.
- Make a mask with the Indian Textile edge stamp and place that in place on the bottom of each of the white card die cuts, lining up the bottom with the bottom of the die cut. Rub over the white card with an anti-static bag. Position the mask carefully so that you can line up the pattern in the same part of the design on each panel (horizontally and vertically). With the mask in place take the large paisley stamp from the Paisley Elephant set and stamp to cover the upper part of first panel. Carefully remove the mask and stamp the Indian Textile edge again in Versamark. Add the violet embossing powder and set with a heat gun. Repeat for the other white panels.
- Add colour to the panels with Distress Inks using the sponge applicators (one for each colour). I used Peacock Feathers and Salty Ocean for the upper section and Picked Raspberry for the edging. I finished by edging the whole panel with Chipped Sapphire.
- Using the Indian fan shaped stamp from the Paisley Elephant set stamp and emboss this 6 times, using Versamark and violet embossing powder. Cut out the central panel from three of the motifs and colour all of them with Distress Inks using the sponges again.
- Using the Aquarelle pencils add colour highlights to the fan and the leaves on the edging stamp. Blend the colours with a fine waterbrush being careful to keep to the areas you are working on so as not to splash the other inked areas as this is watersoluable ink.
- Stamp the sentiment from Butterfly Dreams stamp set onto white card in Versamark and heat emboss. Trim to size and colour with Distress Inks again. Add a matting layer of blue glitter card.
Assemble the card as follows:
- Mount the blue glitter die cut frame onto the dark blue panels with a small amount of pva glue. Stick the embossed and coloured white panels in place in the centre of each frame. Position the fans and decoupaged layer with small foam pads. Decorate the fans with gems. Add the sentiment on the front panel.
- Cut two strips of blue pearlescent card to fit between the panels, allowing a small amount of excess on both sides to score - this will be used to attach the panels together. Think carefully about which way to fold your scores so the screen folds correctly. If you wish you can decorate these panels with a suitable die cut or punched strip in more blue glitter card.
- Use the strips to join the three panels into a screen, being careful to make sure each section is thoroughly stuck in place before moving onto the next. For neatness, I cut three more dark blue panels and covered all the joins. I added a white panel on the back of the last die cut to use for writing a message.
Thank you Elaine for taking the time and trouble to make and send me the card in the first place and then for sharing it with our readers and customers.

.jpg)


A stunning card Elaine, gorgeous colours and a beautiful design. I have actually seen this card in real life, and can only say what a pretty effect the sparkly card coupled with the vibrant colours creates. The stamps really suit this set of Crealie dies so well. Judith xx
Oh such a pretty and rich card! A real gem :)