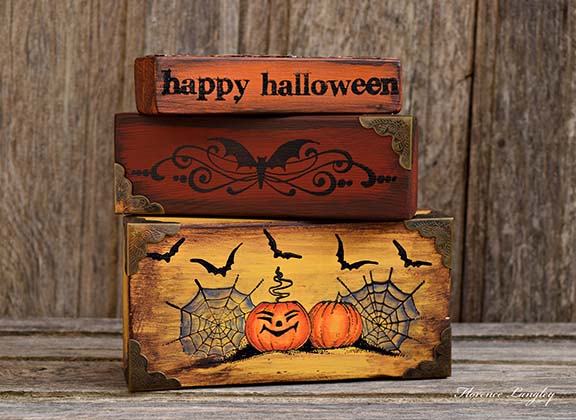
Halloween Blocks by Florence
17 September 2015 | Lesley Wharton
Halloween Blocks
We have recently added to our range of Wood Art Blocks and Florence has designed this stunning project using some of them. I would recommend you use the following sizes of blocks: 7.2 x 4.2cm, 9.7 x 5.3cm and 9.7 x 6.5 cm, however the choice is yours according to how large you would like to make your display.
Materials:
| Halloween Edges stamp set | Kitchen Paper |
| Wooden Blocks | Small duster or piece of cloth |
| Acrylics Block | Heat gun (optional) |
| Gesso | Small kitchen plate |
| Craft Paint: Brown, Orange, Mustard, Grey | Spray Varnish (optional) |
| Sand Paper | Silicone or strong glue |
| Craft paint brushes | Embellishments |
| Wet Wipes | Water |
- Using a piece of sand paper, lightly sand the surfaces of the blocks and remove any dust with a piece of cloth.
- Paint all of the surfaces of the blocks with 2 coats of Gesso, letting each coat dry between applications. Lightly sand the surfaces between coats. Remove any dust using a piece of cloth.
- Paint all of the surfaces of the blocks with 2 to 3 base coats of craft paint letting each coat dry between applications. Lightly sand the surfaces, between coats, to maintain a flat even surface.
- Place 2 to 3 drops of brown paint onto a small plate and dilute this with a little water so that it is of a milk consistency.
- Working on one block and one surface at a time, paint the surfaces of the blocks with the diluted brown paint.
- Take a piece of kitchen roll and remove some of the paint from just the center of the painted surface that is being worked on, leaving the paint just around the outside edges.
- [Tip: If, the diluted brown paint drys a little too much and is stubborn to remove, lightly dampen it with a wet wipe and then remove the paint with a piece of kitchen paper.]
- Very lightly sand all of the surfaces of the blocks and wipe away any dust using a piece of cloth.
- Ink up your stamp with black Archival ink so that it has an even coverage and stamp the images onto the wooden blocks. Repeat this until you have stamped all of the images onto all of the blocks. Leave the ink to completely dry.
- Place one tiny drop of orange paint and 1 drop of grey paint onto a plate and dilute both colors , separately, with water so that the paint is very watery and translucent.
- Using a small paint brush color the images with the diluted paint.
- [Tip: If you have painted over the stamped lines at all, take a clean damp small paint brush and remove the paint]
- Optional: Apply two thin coats of spray varnish.
- Attach any embellishments using silicon or stong glue.
|
A big thank you to Florence for her detailed step by step and for coming up with this fabulous way to use the art blocks. I think this would make a fab weekend project, you could even get the kids involved. And remember, it doesn't have to be about Halloween, this would be wonderful for Christmas set up amongst the decorations.

.jpg)


